<<< Previous releases
...
Notes
| Section |
|---|
click on any thumbnail to view the full sized image | Column |
|---|
| 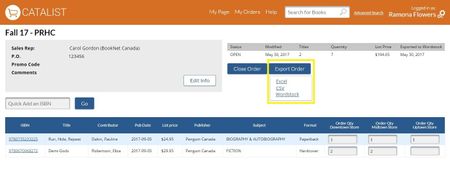 Image Removed Image Removed
 Image Added Image Added |
| Column |
|---|
Retailers using WordStock's point of sale system in their stores can now export orders and title records directly from CataList and import them into WordStock! CataList supports the entry of WordStock-specific fields like store categories, product and publisher numbers, and includes them in the exported details. Single and multi-store set-ups can use the CataList export features. For more information on setting up and using the Wordstock export tools in CataList, see the detailed instructions here: WordStock Integration |
|
...
We've made notes even easier to add in CataList. The new notes box allows you to scroll around the page, access content tabs, copy and paste text from page content and set a left or right pinned position. You can enter multiple private or shared notes, edit notes or change the share status on a note at any time. Click on a note to view or edit it, or click the Add a note button to create a new one. You can mark note text in bold or italic using the following markdown: - To mark text as bold, enclose the text between two asterisks (*)
- To mark text as italic, enclose the text between two underscores (_)
To add a link, simply paste theURL into your note text and the link will automatically be actively linked when the note is in view mode. |
|
Tagging notes recipients automatically in custom catalogues
| Section |
|---|
| Column |
|---|
| 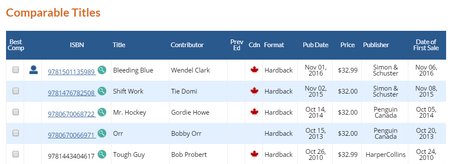 Image Removed Image Removed Image Added Image Added
|
| Column |
|---|
Sales reps can now add their own comparable titles directly on title detail pages. Rep-added comps are identified in the table with the rep symbol:  Image Removed Image Removed
Hovering over this symbol will allow you see which rep added that comp.  Image Removed Image Removed
To add a comparable title, simply click on the Add comparable title button located below the comp title table and add your ISBN! repeat the process to add more comparable titles to the table.  Image Removed Image Removed
To delete a comparable title you've previously added, click the red X in the far left column of the table.
|
...
When you are working in custom catalogues and are sharing to specific recipients, you'll now see a new option you can select to suggest recipients on new shared notes. By default this option is not selected - you'll need to check the box if you want your catalogue recipients to be filled in automatically when you share a note. You can still view, add and edit private notes while working in your custom catalogues, but if you choose to share a note, click the share button at the bottom of the note and your catalogue recipients will automatically be populated into the recipients list for the note. You can remove one or more of the note recipients before sharing the note if needed on particular notes, but to continuing sharing to all catalogue recipients simply click share again. | Tip |
|---|
If you add more recipients to the catalogue after adding shared notes, the new recipients are not added to existing notes, but will be suggested on any future shared notes while working in that catalogue. Similarly, removing recipients from a custom catalogue will not remove the recipients from existing shared notes, but the removed recipients will not be suggested as recipients on future shared notes. |
|
|
Contact Lists
| Section |
|---|
| Column |
|---|
| 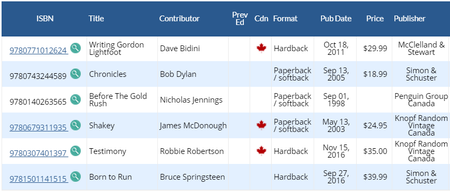 Image Removed Image Removed Image Added Image Added
|
| Column |
|---|
If you are often sending notes or catalogues to the same group of people, or want to add people to your notes who are not in the directory, you also have access to BookNet Canada's SalesData product, look for the new SalesData link icon next to ISBNs in the comparable title table and in catalogue views.  Image Removed Image RemovedClick the icon to open a new tab containing the full SalesData single ISBN report. |
|
...
can now add your contacts to lists in CataList. Account Managers and Catalogue Editors can also share contact lists to the whole company. You can access the contact list builder in your Settings on the Contact Lists tab, or click on the Manage Contact Lists link in the recipient tools on any shared note or custom catalogue. |
|
| Section |
|---|
| Column |
|---|
|  Image Added Image Added
|
| Column |
|---|
To create a new list, click the Create new list button. This launches the form where you can provide a name for your list and add contacts to it. |
|
| Section |
|---|
| Column |
|---|
|  Image Removed Image Removed Image Added Image Added
|
| Column |
|---|
Clean up your Orders page by hiding all your closed orders. Simply click the checkbox at top right above the order table to hide your closed orders. Deselect the checkbox to restore closed orders to your display. |
|
...
Add a name for your list - something you'll remember when you're entering notes and creating catalogues later. If you are an Account Manager or Catalogue Editor, you'll have an option to share this list with the rest of your company. Check the box if you want your list to be shared. In the Add Contact box, you can look-up and add users who are in your account or are opted into the CataList directory. Want to add a contact who isn't in the directory? Simply enter an email address and click Add!
|
|
| Section |
|---|
| Column |
|---|
|  Image Added Image Added
|
| Column |
|---|
Once you've saved your contact list, you'll be returned to the Contact Lists tab in your Settings page. The new list displays, with a summary of the list details and the people you've added to that list. |
|
| Section |
|---|
| Column |
|---|
|  Image Added Image Added
|
| Column |
|---|
You can now look-up and tag your contact lists as a group of recipients for any note or custom catalogue. The contact list name will display, along with a count of the number of contacts that are in that list. |
|
Released: December 13, 2017
Check this space often to find out more about the changes and new features added to BNC CataList.
...